Pen and Brush Settings
In the previous section, we learned the basic drawing of shapes. In this section, we will learn about pen and brush settings.
Pen Object (QPen)
The pen is mainly used to set the thickness, color, style, etc., of shape outlines.
| Common Pen Methods | Description |
|---|---|
| setColor() | Set pen color |
| setWidth() | Set pen width |
| setStyle() | Set style: ● Qt.SolidLine: Normal solid line |
Brush Object (QBrush)
The brush is mainly used to fill geometric shapes with color.
| Common Brush Methods | Description |
|---|---|
| setColor() | Set brush color |
| setStyle() | Set style: ● Qt.SolidPattern: Solid fill |
Usage Example
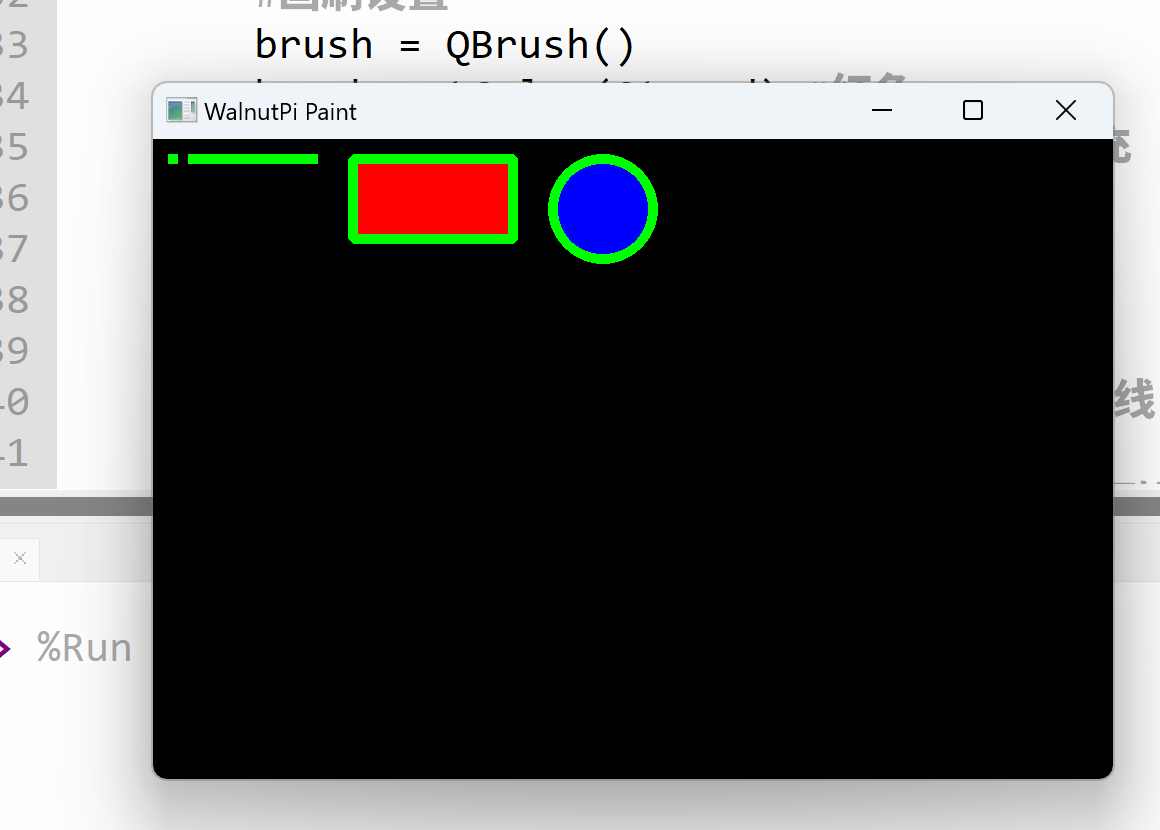
Example: For the shapes drawn in the previous section, set the line width to 5, fill the rectangle with red, and fill the circle with blue.
The implementation code is as follows:
# -*- coding: utf-8 -*-

# pyQT5 For WalnutPi

from PyQt5 import QtCore, QtGui, QtWidgets

from PyQt5.QtCore import Qt
from PyQt5.QtGui import QPainter,QPen,QBrush
from PyQt5.QtWidgets import QWidget

class Window(QWidget):

    def __init__(self):
        super().__init__() # Also execute the parent QWidget's initialization
        self.setWindowTitle("WalnutPi Paint") # Set window title
        self.resize(480,320) # Set window size

        # Window background color setting
        self.setObjectName("Paint_Window")
        self.setStyleSheet("#Paint_Window{background-color: black}") # Black

    def paintEvent(self,event):

        painter=QPainter(self) # Create drawing object

        # Pen settings:
        pen = QPen()
        pen.setColor(Qt.green) # Green
        pen.setWidth(5) # Width 5
        painter.setPen(pen)

        # Brush settings
        brush = QBrush()
        brush.setColor(Qt.red) # Red
        brush.setStyle(Qt.SolidPattern) # Fill
        painter.setBrush(brush)

        painter.drawPoint(10,10) # Draw point

        painter.drawLine(20, 10, 80, 10) # Draw line

        painter.drawRect(100, 10, 80, 40) # Draw rectangle

        # Reset brush to blue
        brush.setColor(Qt.blue)
        painter.setBrush(brush)
        painter.drawEllipse(200, 10, 50, 50) # Draw circle


#################
#   Main Program Code   #
#################
import sys

#【Optional Code】Allow Thonny remote execution
import os
os.environ["DISPLAY"] = ":0.0"

#【Optional Code】Fix display issues on monitors with 2K+ resolution
QtCore.QCoreApplication.setAttribute(QtCore.Qt.AA_EnableHighDpiScaling)

# Program entry point: build the window and display it
app = QtWidgets.QApplication(sys.argv)
window = Window() # Build window object
window.show() # Display window
#window.showFullScreen() # Fullscreen display window

#【Recommended Code】Allow terminal to interrupt window with ctrl+c for easier debugging
import signal
signal.signal(signal.SIGINT, signal.SIG_DFL)
timer = QtCore.QTimer()
timer.start(100)  # You may change this if you wish.
timer.timeout.connect(lambda: None)  # Let the interpreter run each 100 ms

sys.exit(app.exec_()) # Exit process when program closes
The main difference between this code and the previous one is the addition of pen settings and brush settings:
    def paintEvent(self,event):

        ...

        # Pen settings:
        pen = QPen()
        pen.setColor(Qt.green) # Green
        pen.setWidth(5) # Width 5
        painter.setPen(pen)

        # Brush settings
        brush = QBrush()
        brush.setColor(Qt.red) # Red
        brush.setStyle(Qt.SolidPattern) # Fill
        painter.setBrush(brush)
Additionally, the brush was initially set to red, so before drawing the circle after the rectangle, it needs to be reset:
    ...
        # Reset brush to blue
        brush.setColor(Qt.blue)
        painter.setBrush(brush)
        painter.drawEllipse(200, 10, 50, 50) # Draw circle
The result is as follows: